A few weeks ago Raspbian Jessie was released, bringing in a ton of new, great features.
However, the update to Jessie also broke the previous OpenCV + Python install instructions for Raspbian Wheezy:
- Install OpenCV 2.4 with Python 2.7 bindings on Raspbian Wheezy.
- Install OpenCV 3.0 with Python 2.7/Python 3+ bindings on Raspbian Wheezy.
Since PyImageSearch has become the online destination for learning computer vision + OpenCV on the Raspberry Pi, I decided to write a new tutorial on installing OpenCV 3 with Python bindings on Raspbian Jessie.
As an additional bonus, I’ve also included a video tutorial that you can use to follow along with me as I install OpenCV 3 on my own Raspberry Pi 2 running Raspbian Jessie.
This video tutorial should help address the most common questions, doubts, and pitfalls that arise when installing OpenCV + Python bindings on the Raspberry Pi for the first time.
Assumptions
For this tutorial I am going to assume that you already own a Raspberry Pi 2 with Raspbian Jessie installed. Other than that, you should either have (1) physical access to your Pi 2 and can open up a terminal or (2) remote access where you can SSH in. I’ll be doing this tutorial via SSH, but as long as you have access to a terminal, it really doesn’t matter.
The quick start video tutorial
Before we get this tutorial underway, let me ask you two quick questions:
- Is this your first time installing OpenCV?
- Are you just getting started learning Linux and how to use the command line?
If you answered yes to either of these questions, I highly suggest that you watch the video below and follow along with me as a guide you step-by-step on how to install OpenCV 3 with Python bindings on your Raspberry Pi 2 running Raspbian Jessie:
Otherwise, if you feel comfortable using the command line or if you have previous experience using the command line, feel free to follow the tutorial below.
Installing OpenCV 3 on Raspbian Jessie
Installing OpenCV 3 is a multi-step (and even time consuming) process requiring you to install many dependencies and pre-requisites. The remainder of this tutorial will guide you step-by-step through the process.
To make the installation process easier, I’ve included timings for each step (when appropriate) so you know when to stick by your terminal, grab a cup of coffee, or go for a nice long walk.
If you’re an experienced Linux user or have already installed OpenCV on a Raspberry Pi (or another other system) before, you can likely just follow the steps outlined below.
However, if this is your first time installing OpenCV (or you don’t have much prior exposure to the Linux operating systems and the command line), I highly recommend that you watch the video above and follow along with me as I show you how to install OpenCV 3 on your Rasberry Pi running Raspbian Jessie.
That said, let’s get started installing OpenCV 3.
Step #1: Install dependencies
The first thing we should do is update and upgrade any existing packages, followed by updating the Raspberry Pi firmware.
$ sudo apt-get update
$ sudo apt-get upgrade
$ sudo rpi-update
Timing: 3m 33s
You’ll need to reboot your Raspberry Pi after the firmware update:
$ sudo reboot
Now we need to install a few developer tools:
$ sudo apt-get install build-essential git cmake pkg-config
Timing: 51s
Now we can move on to installing image I/O packages which allow us to load image file formats such as JPEG, PNG, TIFF, etc.:
$ sudo apt-get install libjpeg-dev libtiff5-dev libjasper-dev libpng12-dev
Timing: 42s
Just like we need image I/O packages, we also need video I/O packages. These packages allow us to load various video file formats as well as work with video streams:
$ sudo apt-get install libavcodec-dev libavformat-dev libswscale-dev libv4l-dev
$ sudo apt-get install libxvidcore-dev libx264-dev
Timing: 58s
We need to install the GTK development library so we can compile the
highguisub-module of OpenCV, which allows us to display images to our screen and build simple GUI interfaces:
$ sudo apt-get install libgtk2.0-dev
Timing: 2m 48s
Various operations inside of OpenCV (such as matrix operations) can be optimized using added dependencies:
$ sudo apt-get install libatlas-base-dev gfortran
Timing: 50s
Lastly, we’ll need to install the Python 2.7 and Python 3 header files so we can compile our OpenCV + Python bindings:
$ sudo apt-get install python2.7-dev python3-dev
Step #2: Grab the OpenCV source code
At this point we have all of our prerequisites installed, so let’s grab the
3.0.0version of OpenCV from the OpenCV repository. (Note: As future versions of OpenCV are released just replace the
3.0.0with the most recent version number):
$ cd ~
$ wget -O opencv.zip https://github.com/Itseez/opencv/archive/3.0.0.zip
$ unzip opencv.zip
Timing: 2m 29s
Fur the full install of OpenCV 3 (which includes features such as SIFT and SURF), be sure to grab the opencv_contrib repo as well. (Note: Make sure your
opencvand
opencv_contribversions match up, otherwise you will run into errors during compilation. For example, if I download v3.0.0 of
opencv, then I’ll want to download v3.0.0 of
opencv_contribas well):
$ wget -O opencv_contrib.zip https://github.com/Itseez/opencv_contrib/archive/3.0.0.zip
$ unzip opencv_contrib.zip
Timing: 1m 54s
Step #3: Setup Python
The first step in setting up Python for our OpenCV compile is to install
pip, a Python package manager:
$ wget https://bootstrap.pypa.io/get-pip.py
$ sudo python get-pip.py
Timing: 26s
I’ve discussed both virtualenv and virtualenvwrapper many times on the PyImageSearch blog before, especially within these installation tutorials. Installing these packages is certainly not a requirement to get OpenCV and Python up and running on your Raspberry Pi, but I highly recommend that you install them!
Using
virtualenvand
virtualenvwrapperallows you to create isolated Python environments, separate from your system install of Python. This means that you can run multiple versions of Python, with different versions of packages installed into each virtual environment — this solves the “Project A depends on version 1.x, but Project B needs 4.x” problem that often arises in software engineering.
Again, it’s standard practice in the Python community to use virtual environments, so I highly suggest that you start using them if you are not already:
$ sudo pip install virtualenv virtualenvwrapper
$ sudo rm -rf ~/.cache/pip
Timing: 17s
After
virtualenvand
virtualenvwrapperhave been installed, we need to update our
~/.profilefile and insert the following lines at the bottom of the file:
# virtualenv and virtualenvwrapper
export WORKON_HOME=$HOME/.virtualenvs
source /usr/local/bin/virtualenvwrapper.sh
You can use your favorite editor to edit this file, such as
vim,
emacs,
nano, or any other graphical editor included in the Raspbian Jessie distribution. Again, all you need to do is open the file located at
/home/pi/.profileand insert the lines above at the bottom of the file.
Now that your
~/.profilehas been updated, you need to reload it so the changes can take affect. To force a reload of the
~/.profilefile you can (1) logout and log back in, (2) close your terminal and open up a new one, or (3) just use the
sourcecommand:
$ source ~/.profile
Note: You’ll likely need to run the
source ~/.profilecommand each time you open up a new terminal to ensure your environment has been setup correctly.
The next step is to create our Python virtual environment where we’ll be doing our computer vision work:
$ mkvirtualenv cv
The above command will create a virtual environment named
cvusing Python 2.7.
If you want Python 3, run this command instead:
$ mkvirtualenv cv -p python3
Again, it’s important to note that the
cvPython environment is entirely independent from the default version of Python included in the download of Raspbian Jesse.
If you ever reboot your system, logout and log back in, or open up a new terminal, you’ll need to use the
workoncommand to re-access the
cvvirtual environment, otherwise you’ll be using the system version of Python instead:
$ source ~/.profile
$ workon cv
You can ensure you are in the
cvvirtual environment by examining your command line. If you see the text “(cv)” preceding your prompt, then you are in the
cvvirtual environment:
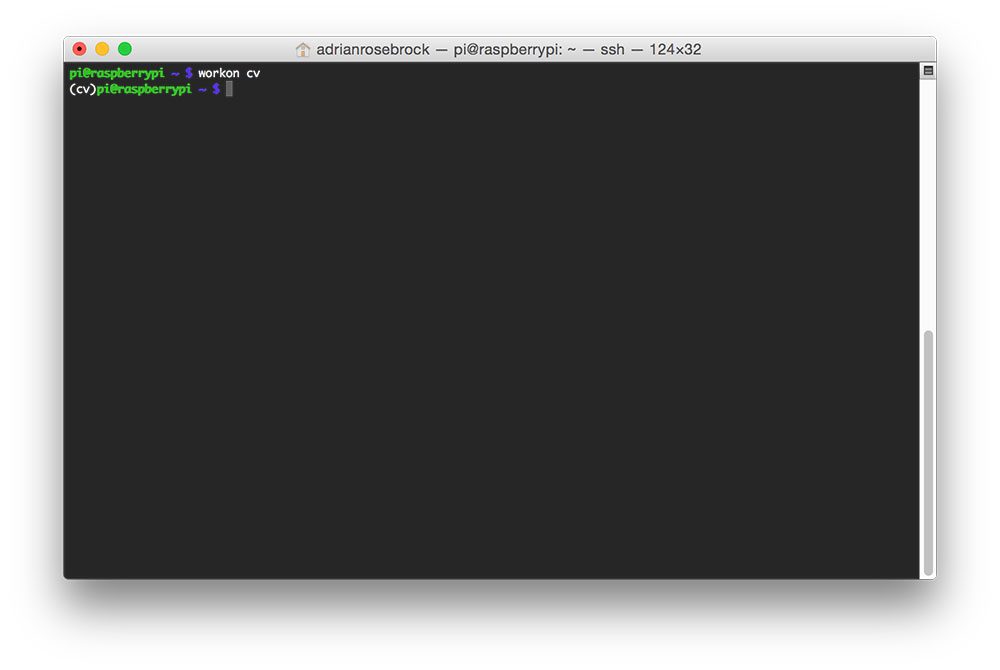
Figure 1: Make sure you see the “(cv)” text on your prompting, indicating that you are in the cv virtual environment.
Otherwise, you are not in the cv
virtual environment:
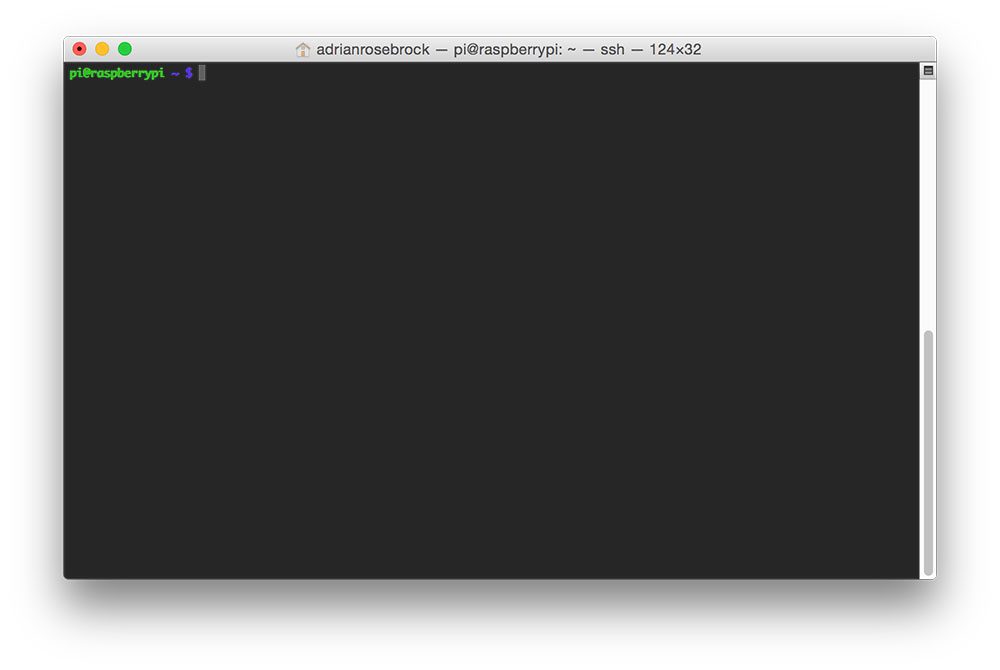
Figure 2: If you do not see the “(cv)” text on your prompt, then you are not in the cv virtual environment.
If this is the case, you need to run the
sourceand
workoncommands above.
Assuming that you are in the
cvvirtual environment, we can install NumPy, an important dependency when compiling the Python bindings for OpenCV. You might want to grab a cup of coffee or go for a walk while NumPy downloads and installs:
$ pip install numpy
Timing: 16m 10s
Step #4: Compile and install OpenCV
At this point, we are ready to compile OpenCV.
First, make sure you are in the
cvvirtual environment:
$ workon cv
Followed by setting up the build:
$ cd ~/opencv-3.0.0/
$ mkdir build
$ cd build
$ cmake -D CMAKE_BUILD_TYPE=RELEASE \
	-D CMAKE_INSTALL_PREFIX=/usr/local \
	-D INSTALL_C_EXAMPLES=ON \
	-D INSTALL_PYTHON_EXAMPLES=ON \
	-D OPENCV_EXTRA_MODULES_PATH=~/opencv_contrib-3.0.0/modules \
	-D BUILD_EXAMPLES=ON ..
Before you move on to the compilation step, make sure you examine the output of CMake!
Scroll down the section titled
Python 2and
Python 3.
If you’re compiling OpenCV 3 for Python 2.7, then you’ll want to make sure the
Python 2section looks like this (highlighted) in red:
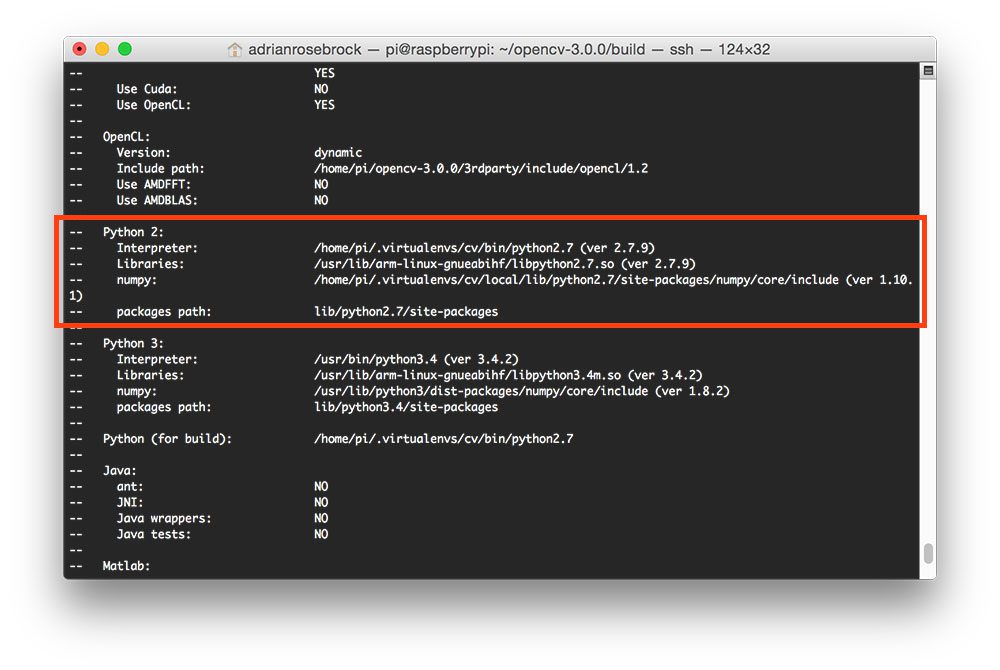
Figure 3: Ensuring that Python 2.7 will be used for the compile.
Notice how both the
Interpreterand
numpyvariables point to the
cvvirtual environment.
Similarly, if you’re compiling OpenCV for Python 3, then make sure the
Python 3section looks like this:
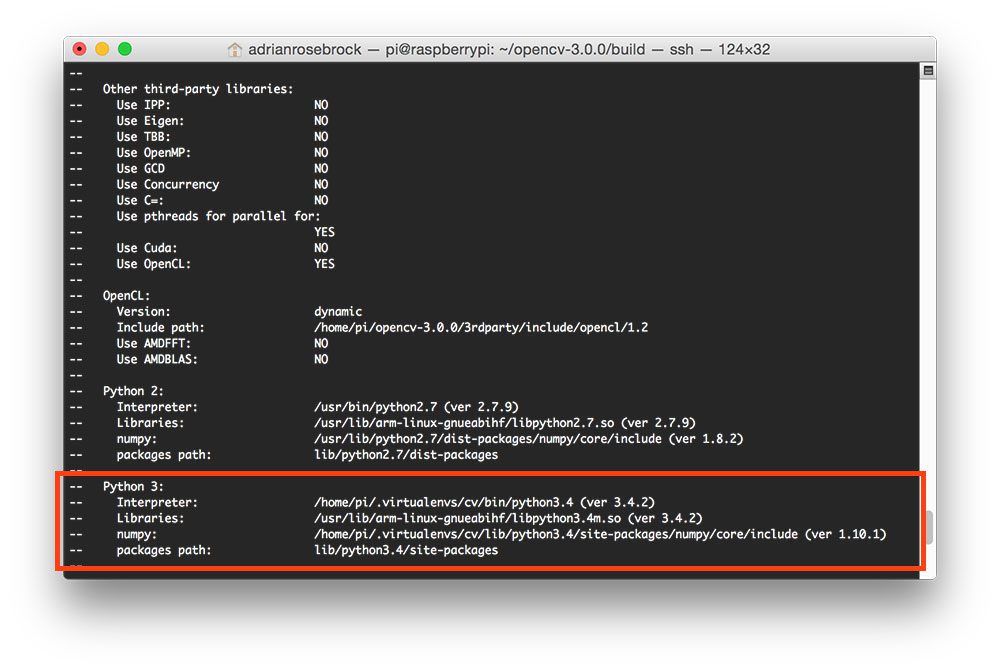
Figure 4: Ensuring that Python 3 will be used for the compile.
Again, both the
Interpreterand
numpyvariables are pointing to our
cvvirtual environment.
In either case, if you do not see the
cvvirtual environment for these variables MAKE SURE YOU ARE IN THE
cvVIRTUAL ENVIRONMENT PRIOR TO RUNNING CMAKE!
Now that our build is all setup, we can compile OpenCV:
$ make -j4
Timing: 1h 35m
The
-j4switch stands for the number of cores to use when compiling OpenCV. Since we are using a Raspberry Pi 2, we’ll leverage all four cores of the processor for a faster compilation.
However, if your
makecommand errors out, I would suggest starting the compilation over again and only using one core:
$ make clean
$ make
Using only one core will take much longer to compile, but can help reduce any type of strange race dependency condition errors when compiling.
Assuming OpenCV compiled without error, all we need to do is install it on our system:
$ sudo make install
$ sudo ldconfig
Step #5: Finishing the install
We’re almost there! Just a few more things and we’ll be 100% done.
For Python 2.7:
Provided you finished Step #4 without error, OpenCV should now be installed in
/usr/local/lib/python2.7/site-packages:
$ ls -l /usr/local/lib/python2.7/site-packages/
total 1636
-rw-r--r-- 1 root staff 1675144 Oct 17 15:25 cv2.so
Note: In some instances OpenCV can be installed in
/usr/local/lib/python2.7/dist-packages(note the
dist-packagesrather than
site-packages). If you do not find the
cv2.sobindings in
site-packages, be sure to check
dist-packagesas well.
The last step here is to sym-link the OpenCV bindings into the
cvvirtual environment:
$ cd ~/.virtualenvs/cv/lib/python2.7/site-packages/
$ ln -s /usr/local/lib/python2.7/site-packages/cv2.so cv2.so
For Python 3:
OpenCV should now be installed in
/usr/local/lib/python3.4/site-packages:
$ ls /usr/local/lib/python3.4/site-packages/
cv2.cpython-34m.so
For some reason, unbeknownst to me, when compiling the Python 3 bindings the output
.sofile is named
cv2.cpython-34m.sorather than
cv2.so.
Luckily, this is an easy fix. All we need to do is rename the file:
$ cd /usr/local/lib/python3.4/site-packages/
$ sudo mv cv2.cpython-34m.so cv2.so
Followed by sym-linking OpenCV into our
cvvirtual environment:
$ cd ~/.virtualenvs/cv/lib/python3.4/site-packages/
$ ln -s /usr/local/lib/python3.4/site-packages/cv2.so cv2.so
Step #6: Verifying your OpenCV 3 install
At this point, OpenCV 3 should be installed on your Raspberry Pi running Raspbian Jessie!
But before we wrap this tutorial up, let’s verify that your OpenCV installation is working by accessing the
cvvirtual environment and importing
cv2, the OpenCV + Python bindings:
$ workon cv
$ python
>>> import cv2
>>> cv2.__version__
'3.0.0'
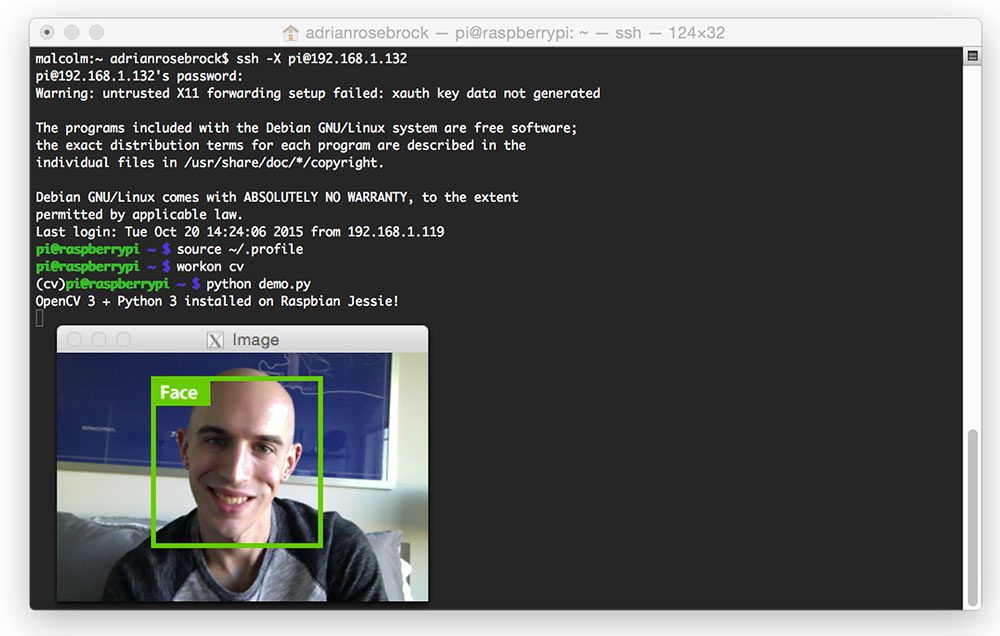
You can see a screenshot of my terminal below, indicating that OpenCV 3 has been successfully installed:
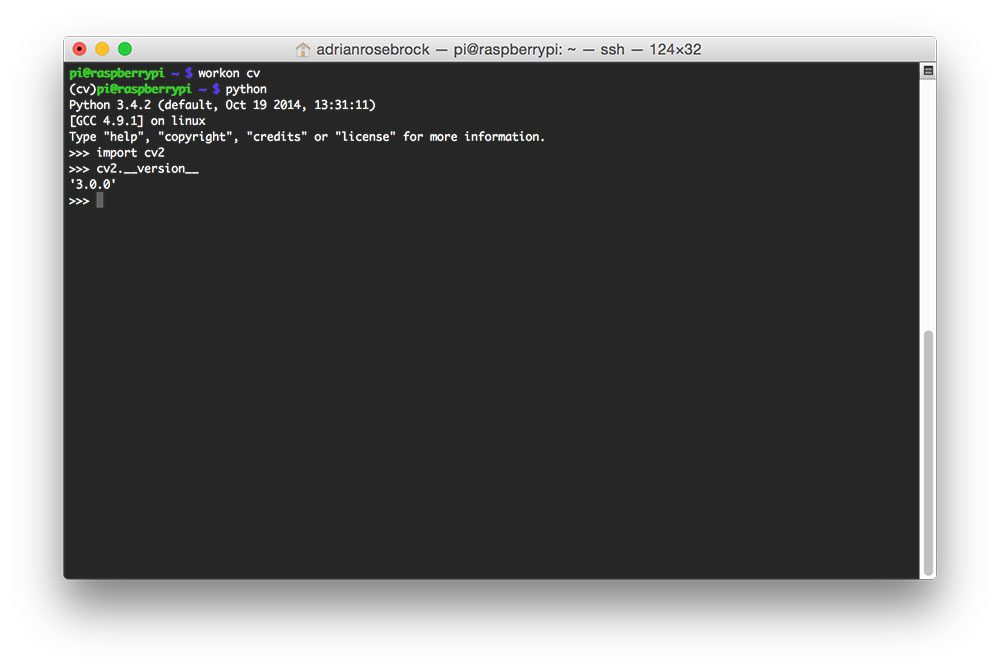
Figure 5: OpenCV 3 + Python 3 bindings have been successfully installed on my Raspberry Pi 2 running Rasbian Jessie.
Troubleshooting
Q. When I try to use the
mkvirtualenvor
workoncommands, I get an error saying “command not found”.
A. Go back to Step #3 and ensure your
~/.profilefile has been updated properly. Once you have updated it, be sure to run
source ~/.profileto reload it.
Q. After I reboot/logout/open up a new terminal, I cannot run the
mkvirtualenvor
workoncommands.
A. Anytime you reboot your system, logout and log back in, or open up a new terminal, you should run
source ~/.profileto make sure you have access to your Python virtual environments.
Q. When I open up a Python shell and type
import cv2, I get the dreaded
ImportError: No module named cv2error.
A. The reason for this error is hard to diagnose, mainly because there are multiple issues that could be causing this problem. For starters, make sure you are in the
cvvirtual environment using
workon cv. If the
workoncommand is giving you problems, then see the previous questions in this section. From there, you’ll want to investigate the
site-packagesdirectory of your
cvvirtual environment located in
~/.virtualenvs/cv/lib/python2.7/site-packages/or
~/.virtualenvs/cv/lib/python3.4/site-packages/, respectively. Make sure that the sym-link path to the
cv2.sofile is valid. If you do not know how to do this, please consult the video tutorial at the top of this post.
Summary
In this lesson we learned how to install OpenCV 3 with Python 2.7 and Python 3 bindings on your Raspberry Pi 2 running Raspbian Jessie. I provided timings for each step so ensure you can plan your install accordingly.
It’s also worth mentioning that I provide OpenCV v2.4 and v3 install instructions for Raspbian Wheezy in the following posts:
- Install OpenCV 2.4 with Python 2.7 bindings on Raspbian Wheezy.
- Install OpenCV 3.0 with Python 2.7/Python 3+ bindings on Raspbian Wheezy.
If you run into any issues during the installation process, please see the Troubleshooting section above. Additionally, I would suggest watching the video tutorial at the top of this post to aid you in the setup process.
Before you go…
I tend to cover a lot of great computer vision projects using OpenCV and the Raspberry Pi, so consider entering your email address in the form below to be notified when these posts go live!
The post How to install OpenCV 3 on Raspbian Jessie appeared first on PyImageSearch.